


How to select a solar charge controller
A solar charge controller is a critical component in every solar installation. It protects your battery storage components and ensures that everything runs efficiently and safely throughout the lifespan of the system.
What is the solar charge controller?
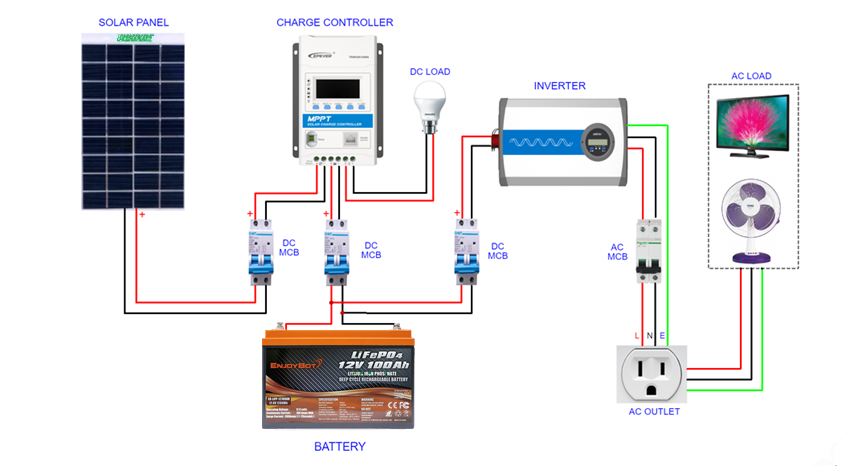
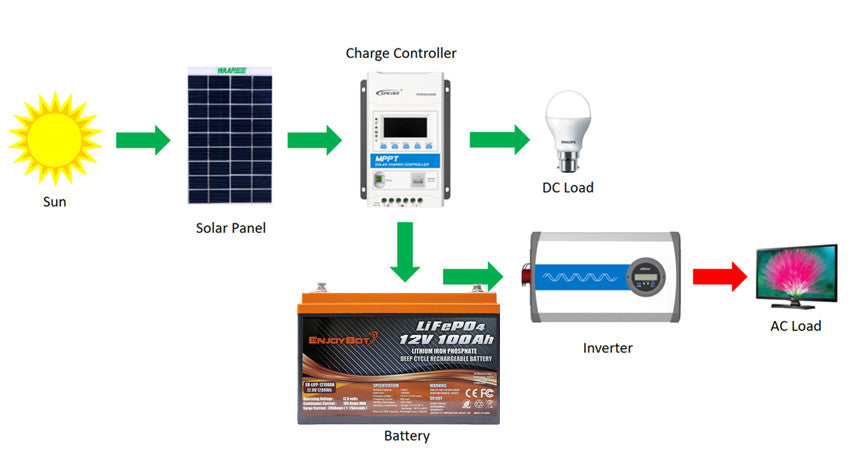
The charge controller in a solar installation sits between the energy source (solar panel) and the storage battery. The charge controller prevents the battery from being overcharged by limiting the amount and rate of charge to the battery. They also prevent battery discharge by shutting down the system if the stored charge power falls below 50% capacity and charging the battery at the correct voltage level. This helps to preserve the life and health of the batteries.
How does a solar charge controller work?
In most charge controllers, the charge current is passed through a semiconductor, which acts as a valve to control the current. The charge controller also prevents the battery from being overcharged by reducing the flow of energy to the battery once it reaches a specific voltage. Overcharging the battery can cause particularly great damage to the battery itself, so the charge controller is especially crucial. The charge controller also provides some other important functions, including overload protection, low voltage disconnection and blockage of reverse currents.
Overload Protection
The charge controller provides the important function of overload protection. If the current flowing into the battery is much higher than what the circuit can handle, the system may be overloaded. This will be leading to overheating or even fire. The charge controller prevents these overloads from occurring. In larger solar systems, we also recommend a circuit breaker and fuse for double safety.
Low Voltage Disconnect
This will work as an automatic disconnect of the non-critical load from the battery when the voltage drops below a defined threshold. When it is being charged, it will automatically reconnect to the battery. This will prevent over-discharge.
Blocking reverse current
The solar panel pumps current through batteries in one direction. During the night, the panel may naturally pass some of the currents in the reverse direction. This may cause the battery to discharge slightly. The solar charge controller prevents this from happening by acting as a valve.
What will affect your decision-making when choosing a charge controller?
These factors should be considered when you are planning to purchase a charge controller. The budget, the climate where the system will be installed,
the controller's lifespan the technology, (What types of charge controllers operate better in colder climates) how high your energy needs, and the size, number, and type of battery used in the system.
These factors all interact in complex ways that can affect you making it difficult to implement effectively. However, there is a clear process to determine which charge controller is right for the application.

Factors to Consider When Deciding to Buy a Charge Controller
Different Types of Solar Charge Controllers
There are two main types of charge controllers to consider: inexpensive but less efficient pulse width modulation (PWM) charge controllers and highly efficient maximum power point tracking (MPPT) charge controllers. Both technologies are widely used to protect batteries, which typically last around 15 years, although this may vary from product to product.
There are certain situations in each of these two main types, and they are clear choices. However, choosing a charge controller is more than simply choosing the right type - beyond that, you must also consider other features in terms of safety and convenience. The quality of these products varies widely, even within the two main categories.
Pulse Width Modulation Charge Controllers are the best for those with small-scale systems. Best for vehicles with smaller systems (vans, motor homes, RVs, tiny homes), and vehicles with warmer climates. PWM charge controllers have been around longer, and are simpler and more inexpensive than MPPT controllers. The PWM controller regulates the flow of energy to the battery by reducing the current gradually, called pulse width modulation. As opposed to providing a stable output, a PWM charge controller provides a series of short charge pulses to the battery.

While effective, this pulse width modulation results in a loss of power between the solar panel and the battery. This type of charge controller can not adjust voltages, only switch off intermittently to prevent excessive voltage to the batteries. The voltage and current put out by the solar panel are always shifting, so this inevitably leads to some waste when using a PWM solar charge controller. When the battery is fully charged, the PWM charge controller is continuously providing a tiny amount of power to keep the battery full. This two-stage regulation is ideal for systems that may experience little energy use. PWM controllers are best for small-scale applications because the solar panel system and battery must have matching voltages. The current is drawn out of the panel at just above the battery voltages.
Many PWM charge controllers have a range of different extra features. 10A PWM charge controller can be used with 12 volts or 24 volts batteries or batteries bank and come equipped with self-diagnostics and electronic protection functions to prevent damage from installation mistakes or system faults.
Pros:
Cheaper than MPPT solar charge controllers.
Best fit for smaller systems where the efficiency is not as critical.
Best for warm sunny weather.
Generally, longer lifespan due to fewer components that may break.
Performing is best when the battery is near the full state of charge.
Cons:
Less efficient than MPPT solar charge controllers.
Because solar panels and batteries have to be matching voltages with these controllers, they are not ideal for larger and more complex systems.
MPPT Controllers are the best fit for those wanting a highly efficient system.
Best for those with larger systems like cabanas, dwellings, and cottages, and those living in colder climates.
MPPT controllers are efficient at using the full power of the solar panels to charge batteries. With MPPT solar charge controllers, the current is drawn out of the panel at the maximum power voltages, but they also limit their output to ensure batteries do not get overcharged. MPPT charge controllers will monitor and adjust their input to regulate the current from the solar system. The overall power output will therefore increase, and you can expect a good efficiency rating of 90% or higher. In other words, MPPT stands for Maximum Power Point Tracker; these controllers are much more advanced than PWM charge controllers and enable the solar panel to operate at its maximum power point, or more precisely, at the optimum voltage and current for maximum power output. Using this ingenious technique, the efficiency of MPPT solar charge controllers can be increased by up to 30%, of course, it depends on the battery voltage and the operating voltage (Vmp) of the solar panel.
The working principle of the MPPT solar charge controller is rather simple - due to the changing sunlight (irradiance) falling on the solar panels throughout the day, solar panels’ voltage and current are constantly changing. To generate maximum power, an MPPT sweeps through the panel voltage to find the sweet spot or the best combination of voltage and current to produce the maximum power. The MPPT continuously tracks and adjusts the PV voltage to produce maximum power, no matter what time of day or weather conditions.
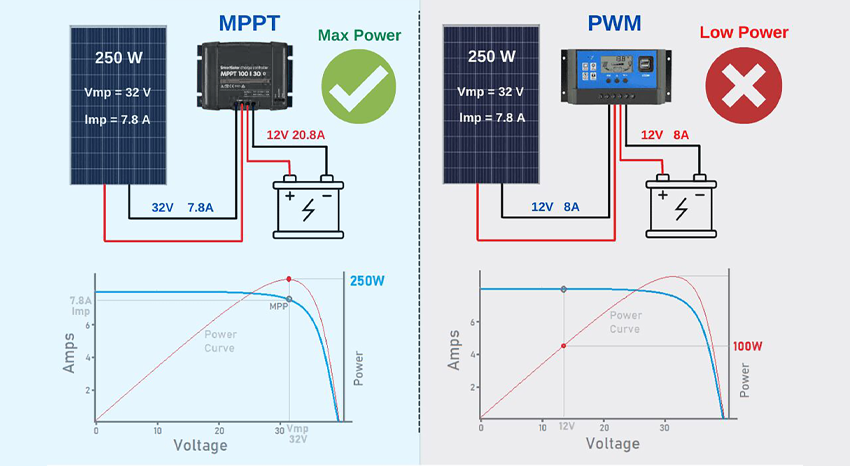
PWM Vs MPPT Example
For example, a common 60-cell (24V) solar panel with an operating voltage of 32V (Vmp) is connected to a 12V battery pack using PWM and an MPPT charge controller. With a PWM controller, the panel voltage has to drop to match the battery voltage, so the power output is significantly reduced. Using an MPPT charge controller, the panel can operate at its maximum power point, which in turn can generate more power.
Battery Voltage Options
Most MPPT solar charge controllers typically support a range of different battery voltages. For example, most smaller 10A to 30A solar controllers can be used to charge either a 12-volt or 24-volt battery, while larger capacity or higher input voltage solar charge controllers are designed to be used on 24-volt or 48-volt battery systems.
Besides the current (A) rating, the maximum solar array size that can be connected to a solar charge controller is also limited by the battery voltage. Obviously, a 24-volt battery allows more solar to be connected to a 20A solar charge controller than a 12-volt battery.
According to Ohm's law and the power equation, higher battery voltages enable more solar panels to be connected. This is because of the formula, Power = Voltage x Current (P=V*I). Like 20A x 12.5V=250W, while 20A x 25V=500W. So using a 20A controller with a higher 24-volt battery will double the amount of solar energy allowed to connect compared to a 12V battery.
20A MPPT with a 12-volt battery = 260W max Solar recommended
20A MPPT with a 24-volt battery = 520W max Solar recommended
20A MPPT with a 48-volt battery = 1040W max Solar recommended
For the MPPT charge controller to work properly, the solar panel operating voltage must be at least 4-volt to 5-volt higher than the battery charging (absorption) voltage, not the nominal battery voltage. On average, the actual panel operating voltage is about 3-volt lower than the optimal panel voltage (Vmp).

In addition, All solar panels have two voltage ratings, which are determined under standard test conditions (STC) based on a cell temperature of 25°C. The first is the maximum power voltage (Vmp), which drops slightly under cloudy conditions, or when the solar panel temperature increases. The second is the open-circuit voltage (Voc), which also decreases at higher temperatures. For the MPPT to work properly, the panel operating voltage (Vmp) must always be several volts higher than the battery charge voltage under all conditions, including high temperatures.
So, MPPT charge controllers are highly recommended for most large solar power systems. PWM charge controllers are typically only a viable option for smaller applications such as for RV trips or possibly for a small off-grid cottage.
The MPPT solar charge controller delivers superior performance, with the only real downside being the additional cost compared to more basic options.
Pros:
MPPT charge controllers have a highly efficient.
It is most suitable for large-scale systems where the additional energy production is valuable.
It is best in colder, cloudier environments.
It is ideal for situations where the solar array voltage is higher than the battery voltage.
Performs are best when the battery is in a low state of charge.
Cons:
The MPPT charge controller is more expensive than the PWM controller.
Typically shorter life span due to more components.

How to size the charge controller
When it comes to charge controller sizing, you have to take into consideration whether you are planning to use a PWM or MPPT controller. An improperly selected charge controller may be caused up to a 50% loss of solar-generated power.
Charge controllers are sized depending on the solar array's current and the solar system’s voltage. Usually, you may want to make sure your charge controller is big enough to handle the power and current the panel is producing. Typically, charge controllers come in 12 volts, 24 volts, and 48 volts. Current (Amperage)ratings can be between one to 60 amps, and voltage ratings from 6 to 60 volts.
When it comes to sizing your system properly, the amps are the value you’ll have to pay the most attention to for your charge controller. You need the right voltage as well, but that’s as simple as matching the system and charge controller nominal voltages.
The amperage is instead based on your energy use and battery capacity, which can be much more challenging to determine.
If your solar system's volts were 12V and your amps were 14A, you will then need a solar charge controller that had at least 14 amps. However, due to environmental factors, you need to factor in an extra 25% bringing the minimum amps that this charger controller must be arriving at 17.5 amps. So in this case, you will need a 12 volts, 20 amps charge controller.

PWM Controller Sizing
The PWM charge controller cannot limit its current output. They simply use the array current. Therefore, if solar arrays can produce 40 amps of current and the charge controller you are using is only rated to 30 amps, then the controller will be damaged. It is crucial to ensure that your charge controller matches, is compatible with and properly sized to your solar panel.
When you are looking at a charge controller, there is a range of things to examine on its list of specifications or labels. A PWM controller will have an amp reading for it, like a 30 amps PWM controller. This represents how many amps the controller can handle, which in the above case is 30 amps. Generally, the two things you need to look at in a PWM controller are the amperage and the voltage rating.
Firstly, we need to look at the nominal system voltages. This will tell us what voltages battery banks the controller is compatible with.
Secondly, we need to look at the rated battery current. Let’s make an assumption that you have a 30 amps rating charge controller. We recommended a factor of safety of at least 1.25, meaning you can multiply the current from your panels by 1.25 and then compare that to the 30 amps. For example, five 100 watts panels in parallel can be 5.29 x 5 = 26.45 Amps. 26.45 amps x 1.25 = 33 amps, this would be too much for the controller. This is because the panel can experience more current than what it is rated for when exposure to sun rays is above 1000 Watts/m^2 or tilted.

Thirdly, let's take a look at the maximum solar energy input. This will tells you how much voltage you can have going into the controller. This controller cannot accept voltages over 50 volts. Let's take a look at 2 x 100 watts panels in series for a total voltage of 22.5 volts (open circuit voltage) x 2 = 45 volts. In this case, the two panels can be connected in series.
Fourthly, we can look at the terminal. Each controller typically has a maximum gauge size of the terminal. This is very important when you are purchasing wiring for your system.
Finally, you can have a look at battery types. This tells us what battery is compatible with your charge controller. It is important to check this as you don’t want to have batteries that cannot be charged by the controller unit.
It is important to check this as you don’t want to have batteries that cannot be charged by the controller unit.

MPPT Charge Controller Sizing
Because the MPPT charge controller limits its output, you can make an array as large as you want and a controller will limit the output. However, this means your system is not as efficient as it could be since you have panels that are not being properly utilized. MPPT controllers will have amps reading for it, like a 40 amps MPPT controller. Even if your panel has the potential to produce 80A of current, the MPPT charge controller will only produce 40A of current, no matter what.
They will also have a voltage rating, but unlike PWM controllers, the input voltage rating is much higher than the battery banks it will charge. This is because of the special ability of the MPPT controller to reduce the voltage to the battery bank voltages and then increase the current to make up for the lost power. You don't have to use high input voltages if you want to avoid series connections in small systems, but it's very beneficial in larger systems.
Let’s assume a controller’s label shows that it can handle 12 volts or 24volts battery banks. You can look for the Rov value. For example, if it shows Rov-40, this means it is rated for 40 amps of current.
Additionally, let's look at the maximum solar input voltages. For example, if the MPPT controller can accept a 100 volts input, it will then accept (up to) 100 volts and step down to 12 volts or 24volts battery. Let’s say you have 4 100 watts panels in series, each with an open circuit voltage of 22.5 volts. Those four in series voltages are 4 x 22.5 volts = 90 volts, which the controller can accept.
Being able to accept higher voltages makes MPPT solar charge controllers particularly suited to some specific applications. Higher voltages lead to less power loss across a length of wire, which is why the long-distance transmission lines to carry large amounts of electricity.
If your battery banks are some distance from your panels, running the system at higher voltages and relying on MPPT solar charge controllers is the best way to cut down transmission loss.
Can you use multiple charge controllers?
In situations where a single charge controller is not enough to handle the output of the solar panel arrays, you can use multiple charge controllers with a single battery bank. In fact, for MPPT solar charge controllers, this is probably the best way to connect the system as the arrays have different maximum power points. Having two controllers can be optimized the total power output.
However, we do recommend using the same type of controller if you are using multiple controllers. So if you have an MPPT charge controller, all of your charge controllers should be MPPTs. In addition, you will need to make sure all of your solar charge controllers have the same battery setting input.

What is the upper voltage limit?
All charge controllers have an upper voltages limit. This refers to the maximum amount of voltage that the controller can safely handle. Ensuring you know the upper voltage limit of the controller. Otherwise, you could burn out the solar charge controller or create other safety risks.
While there are many other factors at play to determine whether you are selecting the correct size controller, there is very little wiggle room when it comes to the upper voltage limit.
Selecting the wrong size in terms of amperage can leave you without the capacity you need from your charge controller, but an insufficient upper voltage limit will lead to your system not functioning at all.
You need to ensure that your charge controller can handle the maximum voltage that’s put out by your solar power system. In general, this is a serious concern if you are running solar panels in series.
When you connect panels in series, the voltage adds up with each solar panel. So your two 12 volts panels are now putting out 24 volts, which will surely fry your 12 volts charge controller.
Common Charge Controller Errors and Mistakes
Due to all the different components of a solar installation, it is easy to make mistakes during the installation process. There are some common mistakes made with solar charge controllers.
Do not connect AC loads to the controller. Only DC loads should be connected to the output of the controller.
Certain low-voltage appliances have to connect directly to the battery.
The controller should always be installed near the battery, as accurate measurement of the battery voltage is an important part of the solar charge controller's function.
During operation, there may be some potential problems that can arise with the controller. You can find that your solar power system has no power at all. This situation may be caused by disconnected or improperly connected wires. Check that all connections are made and verify that none are reversed.
The temperature of various components is of serious concern when it comes to the solar charge controller. The worst-case scenario is the core of the battery overheating, which can lead to significant damage. The controller itself can also overheat, which should happen before the battery does to prevent further damage.
For the highest level of safety from your solar power system, you should look into a battery temperature sensor or a battery with BMS. This simple device monitors battery temperature and prevents disastrous overheating. A lithium battery with BMS can keep it in safe conditions.
Conclusion
Whether you are in an RV, a marine boat, an off-grid cabin or your home, If you are planning to set up a solar system for it, charge controllers are an essential part of your solar installation. Doing the research and weighing your options before making an investment will ensure you choose the right controller for you and your system.


